
Update: The Davinci IQ vaporizer has been replaced by the Davinci IQ3 and the Davinci IQC. I’m currently working on my Davinci IQ3 review and will update this page when it’s complete. Check out my current Davinci vaporizer reviews below:
You can also check out my update-to-date list for the best dry herb vaporizer. Hit me up in the comments or via my contact page with any questions.
The Davinci IQ is the third and newest portable dry herb vaporizer manufactured by Davinci. They launched their first unit the ‘Davinci Vaporizer’ in the first half of 2012. They followed it up with the ‘Ascent’ at the end of 2013.
At the end of 2016, we got the Davinci IQ. The IQ introduces a completely new design featuring a replaceable 18650, smart path technology, a zirconia ceramic bowl, vapor path, and mouthpieces. The IQ vaporizer features an all-glass vapor path, conduction heating, and a full temp spectrum with precise temp control.
It also offers quite a few temperature features within the app that I talk about further down in this review but unfortunately, the Davinci APP is not available for iPhone/Apple users. Luckily, you don’t need the app AT ALL to operate the Davinci IQ. You can change smart paths, change temps, and much more with the controls directly on the device. I’m really glad they designed the device this way and it’s much easier to use and customize because of this.
The Davinci IQ vaporizer retails for $199 and is available in Blue, Gunmetal and Stealth. Now lets jump into my Davinci IQ Review.
Table of Contents
- 1 Size, Portability, and Build Quality
- 2 Accessories, Mouthpieces, and Flavor Chamber
- 3 Vapor Quality, Heating, Temp Options
- 4 Davinci IQ APP (Android Only)
- 5 Chamber Info and Packing Recommendations
- 6 Cleaning and Maintenance
- 7 Battery Information
- 8 Davinci Vaporizer Comparisons
- 9 Glass Options
- 10 Davinci IQ Review Summary
- 11 Davinci IQ Vaporizer Review Video
Size, Portability, and Build Quality
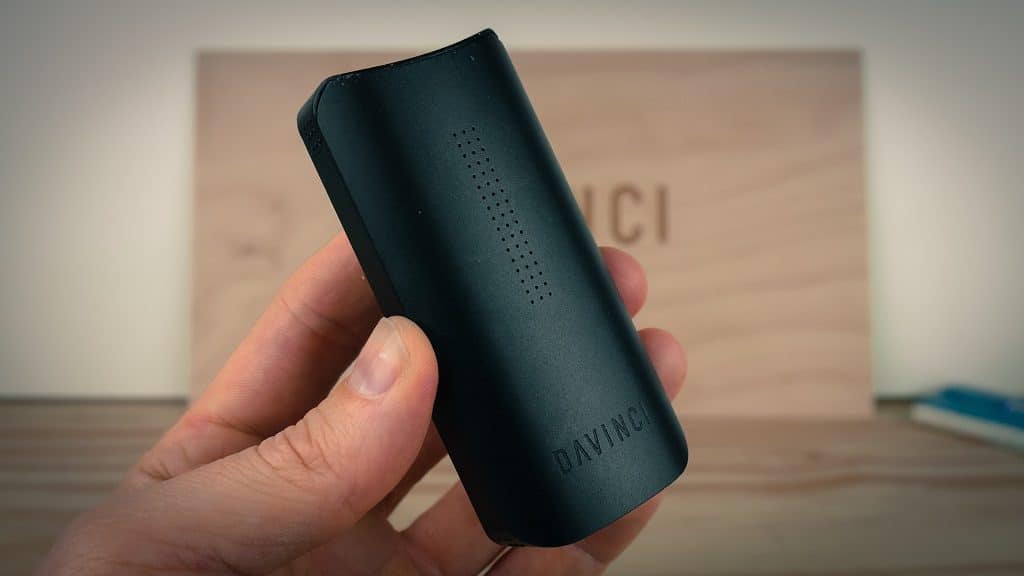
Size & Portability – The first thing I was blown away by was the size. I saw some photos of the IQ before I actually got my hands on it so I knew it was small, but I was still surprised by how small it actually was when it finally arrived. It does weigh bit more than I expected for its size so it feels very solid and durable in the hands.
The IQ weighs roughly 145 grams compared to two of the lightest portables the Pax 3 comes in at around 95 grams, and the TI Grasshopper weighs about 55 grams. So the IQ carries a bit of extra weight when compared to some of the smallest portables currently available.
The overall size and shape of the unit make it easy to pocket and you can completely palm it during use for maximum discretion.
Build Quality – The weight is a testament to the build quality and once you get one in your hands you’ll understand what I’m talking about. I think if were any lighter it might seem cheap and you’d worry about dropping it. The buttons all work as they should and just feel very nice, I like the outside finish of the unit, I like the feel of the zirconia ceramic.
Overall it’s a great looking and great feeling unit to hold and use. When you get it in your hands and look at how it was designed, every bit of space is used, and all the materials are solid and high quality.
Accessories, Mouthpieces, and Flavor Chamber
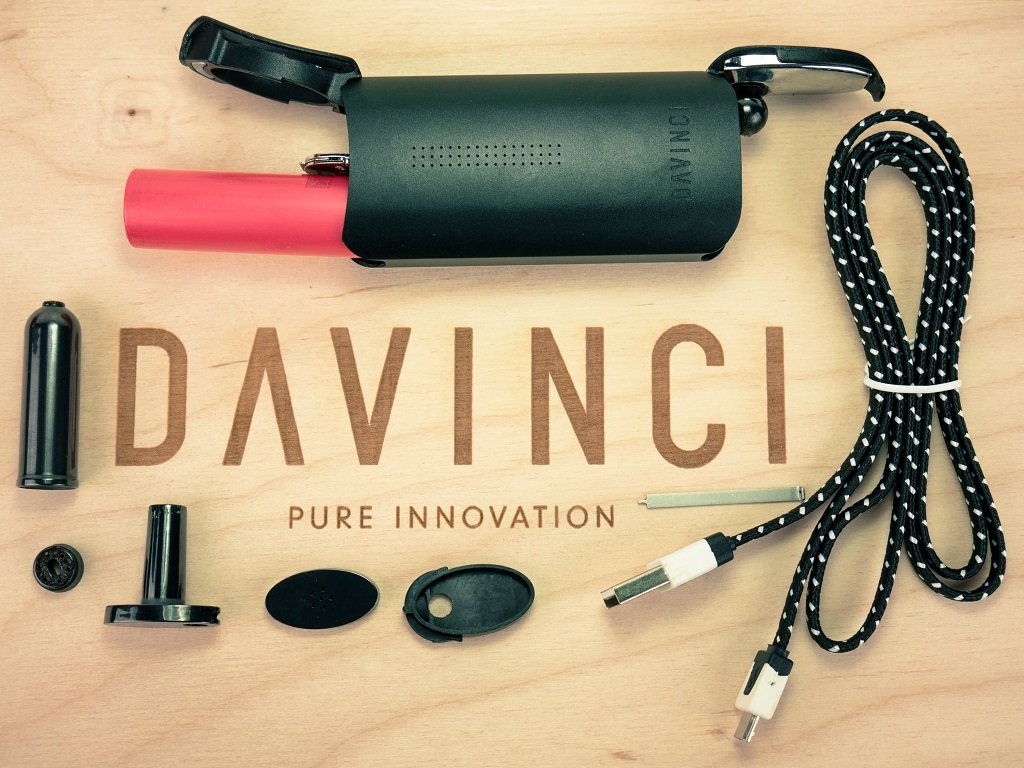
The standard package for the Davinci IQ includes the vaporizer itself, one rechargeable/replaceable 3500mAh 18650 battery, a USB charging cable, a zirconia flavor chamber and 2 mouthpieces (one recessed and one extended 10mm adapter).
Ceramic Zirconia Mouthpieces – Both mouthpieces are made from ceramic zirconia and provide excellent flavor while being very durable and easy to clean. I personally prefer the recessed mouthpiece when I am carrying it in my pocket on the go. The recessed mouthpiece also allows you to completely palm the vaporizer for concealment.
I also enjoy using the raised mouthpiece, but I find myself using it more at home, it’s pretty cool that the raised mouthpiece makes a good seal against 10mm female or 14mm male glass.
Davinci IQ Flavor Chamber – The IQ comes with a newly designed insert called the “flavor chamber”. The flavor chamber sits in the vapor path right before the vapor gets to your lips. You can load your herbs (in chunks, not ground up) and the flavor chamber will only partially heat up, enough to express flavor without cooking. The herbs will also be coated with vapor that condenses as it passes through the flavor chamber.
I gave this a try and wasn’t really blown away. After about 6-8 sessions with some herbs loaded, the draw resistance started to ramp up, so I emptied them out. They were still green, but less vibrant green than originally.
It kind of just made the un-used nugs smell/taste a bit worse but they did come out a bit more potent, definitely interesting but not something I’ll be doing often. You can also load other herbs, like mint into the flavor chamber, but I have been leaving it empty most of the time.
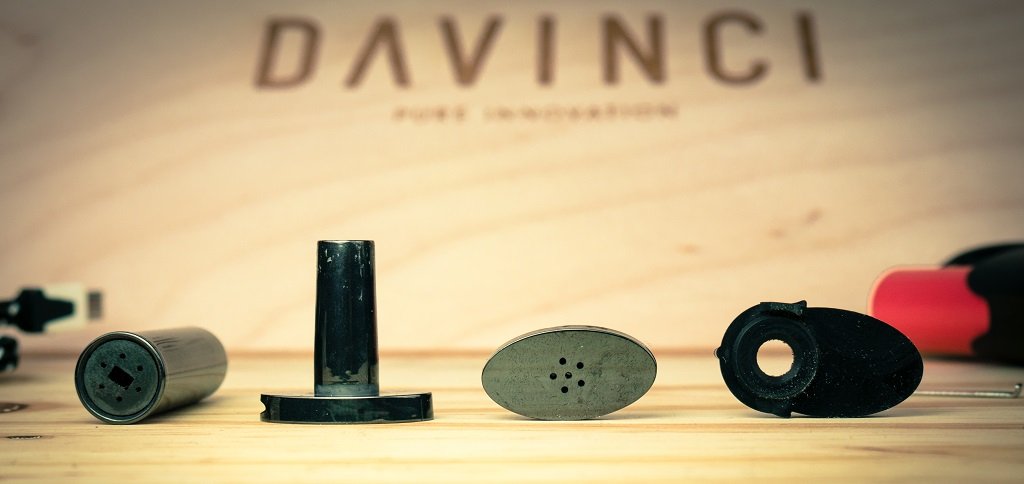
The flavor chamber does help to cool and smooth the vapor before it gets to your lips by increasing the amount of space the vapor has to travel. It also seems to help cut down on the cleaning by absorbing the majority of condensed vapor that would otherwise end up in the mouthpiece, and it just pops in and out for quick and easy for cleaning. If you wait for a little while in-between cleaning the flavor chamber, you can also reclaim some concentrate.
Vapor Quality, Heating, Temp Options
Overall the vapor quality of the IQ is very good, and in my opinion, produces the best vapor of any conduction portable out yet. The entire vapor path on the IQ is ceramic zirconia and provides very cool dense and pure flavored vapor.
The heater is also quite powerful so it can produce dense vapor and does not get overpowered as easy as other conduction units when back to back big draws are taken. I have also found this unit to be very efficient with my herbs, and it produces very even AVB without stirring as long as you don’t cut the session too short. If you do need to vape in a hurry, I recommend using the included stirring tool halfway through the session.
The IQ offers a complete temp spectrum ranging from 250F to 430F and will hit your desired temp in about 45 seconds on average. The vaporizer comes with three main heating options. First, you can choose from one of the four fully customizable smart paths or you can use precision mode to pick an exact temp. While you are in either heat setting, you can also turn on Boost mode to ramp the oven temp.
IQ Smart Paths – The Smart Paths are pre-programmed to start at a selected temp and gradually increase 20 degrees over 10 minutes. You can completely customize each of these sessions for your personal preferences via the Davinci APP. My preferred default smart paths have been 1 and 2. Both of those are providing plenty of clouds while delivering the best taste.
The default temps for setting 3 and especially 4 produce huge clouds but I prefer the taste more at the lower and medium temps. Overall I have enjoyed the smart paths, often times I use multiple temps during a session, and this allows me to set it up on auto-pilot. Some strains also perform differently so you could set up custom smart paths for your favorite strains.
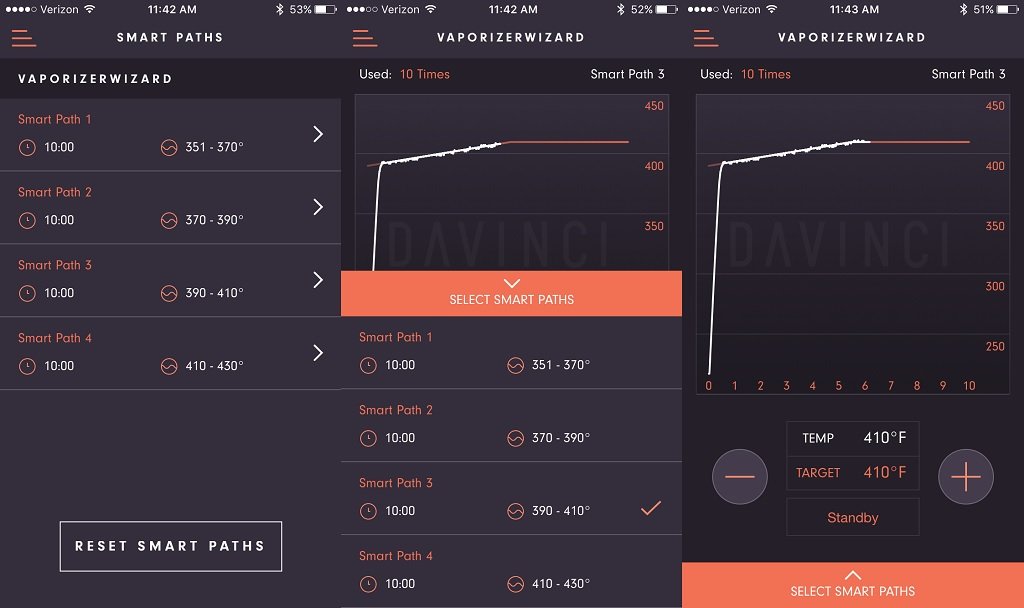
Default Smart Path Temps
The Smart Paths run from 350F to 430 with the first path ranging from 350-370, second path 370-390, etc… Each path is programmed to gradually hit the max temp about halfway through the session and maintain that temp for the remainder. Again, with the app, you can completely customize the temps on all 4 smart paths.
Precision Mode – This mode allows you to pick a precise temp and the IQ will maintain it for the entire 10-minute session. You can change it at any time. To turn on precision mode tap the top button one time, and then press the up and down button to set your desired temp.
Boost Mode – When you hold down the top button boost mode will be activated, and the heater will be engaged full tilt. You will see up arrows appear on the front of the IQ letting you know its heating up. The heater will now slowly work its way up to a max of 430 as long as you continue holding the button, and as soon as you let off the temp will drop back down to the previous setting. This can help you get a little extra juice of a draw.
*The IQ has an auto-shutoff timer of 10 minutes. Just press the control button five times to turn the unit back on.
Davinci IQ APP (Android Only)
It’s important to note that you don’t need the app to access the entire range of Davinci IQ features, the app just adds extra customization.
UPDATE: The Davinci APP is NOT available for iPhone users but the Apple store banned vape apps. HOWEVER, you don’t need the app AT ALL to operate the Davinci IQ. You have full control of the device minus a few unnecessary features that I mention below.
While I am always a bit hesitant about apps, I do want to say this is my favorite vaporizer app yet, it has just worked smoothly and has been enjoyable to play around with. Often times apps can feel clunky or obnoxious, I have had only positive experiences with the Davinci App so far.
Once you get into the app you can choose between the four different default Smart Paths and modify the temps or pick a precise temp for the entire session.
You can activate “Stealth Mode” which will dim the LED’s within the app, This is definitely recommended because the default LED brightness are pretty bright, bordering on too bright. You can also activate Stealth mode without the app by clicking the top button and the down button together at the same time.
Without the app, you won’t be able to customize the smart path sessions, turn off vibration alerts, or get device information like total usage time, average session length, average temp and favorite path. You also won’t be able to see the number of times you’ve used each of the smart path choices. So overall it’s not a big deal if you don’t want to use the app, but at the same time, it adds some cool stuff so overall I really like that they made the IQ app relevant but not necessary.
Chamber Info and Packing Recommendations
The chamber is pretty easy to pack, and I get the best results with a tight and fully packed oven. If you grind your herb coarsely you won’t get as much vapor production but there will be less draw resistance, and if you grind really finely you will get denser vapor but more draw resistance.
I have been enjoying a medium grind, but unlike a lot of conduction vapes, this thing actually performs pretty darn well even with coarse grinds. A fully packed chamber is generally around .30 grams.
I also recommend the glass spacers (free if you get it from Davinci). The Davinci IQ Glass Spacers will allow you to shrink the chamber, using less herb and still get the same great results. Perfect for micro-dosing or even for two people.
Cleaning and Maintenance
Overall the IQ is pretty quick and easy to clean, you will want to empty out the bowl after each use, and brush or blow out the chamber. This will help keep cleaning to a minimum. The flavor chamber needs to be cleaned the most often, and you can just slide it out, and drop it right into isopropyl alcohol and soak/rub it off.
The mouthpieces will need to be cleaned the most next, and like the flavor chamber, they can be just popped out and dropped into some iso. Generally, I have been cleaning the ceramic parts about every 10 or so sessions.
Battery Information
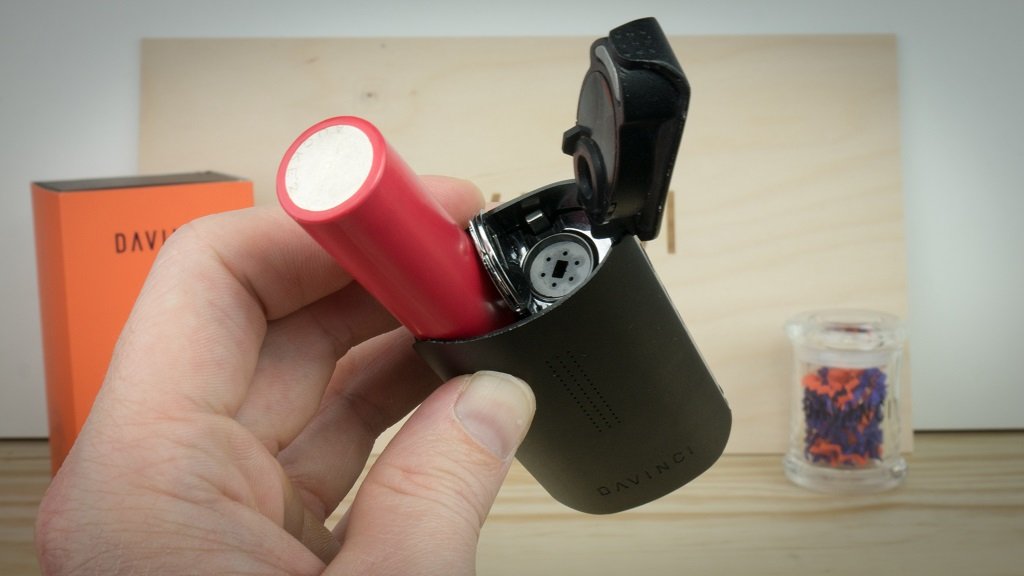
The Davinci IQ comes with one replaceable/rechargeable 3500mAh 18650 battery. I’ve found the batteries will last me anywhere from 50-80 minutes of use on average.
The replaceable battery system is awesome but after some testing, I’ve found that it is taking me about four hours to charge a dead battery inside the Davinci IQ.
To mitigate this, you can pick up an external charger (nitecore i2 ~$10) and an extra battery ($13) so that way you have some flexibility for charging options. The batteries will charge in the external chargers in about a little over 2 hours so basically twice as fast.
Davinci Vaporizer Comparisons
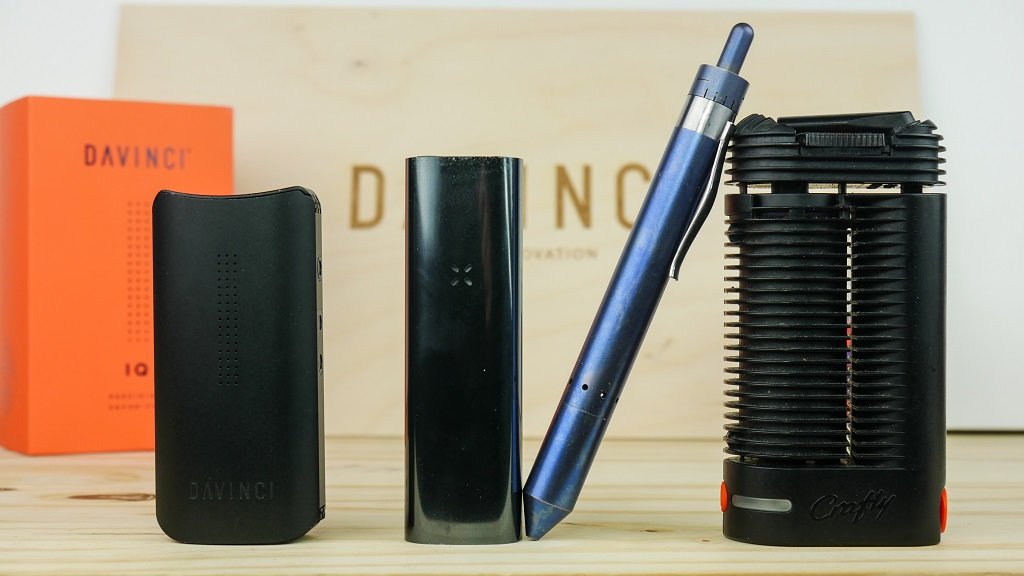
In my opinion, the IQ vaporizer is definitely worthy of the $274.99 price tag but it puts it directly in competition with my other favorite portable vaporizers.
Pax 3 ($249) – The Pax 3 vape is my go-to for outdoor activities like Mt Biking, Skiing, and Hiking. It’s easily pocketable, extremely durable and heats up in 15 seconds on average. The Pax 3 retails for $249, uses conduction heating, offers a phone app to control temps and also comes with a 10-year warranty so both of these vaporizers are extremely alike.
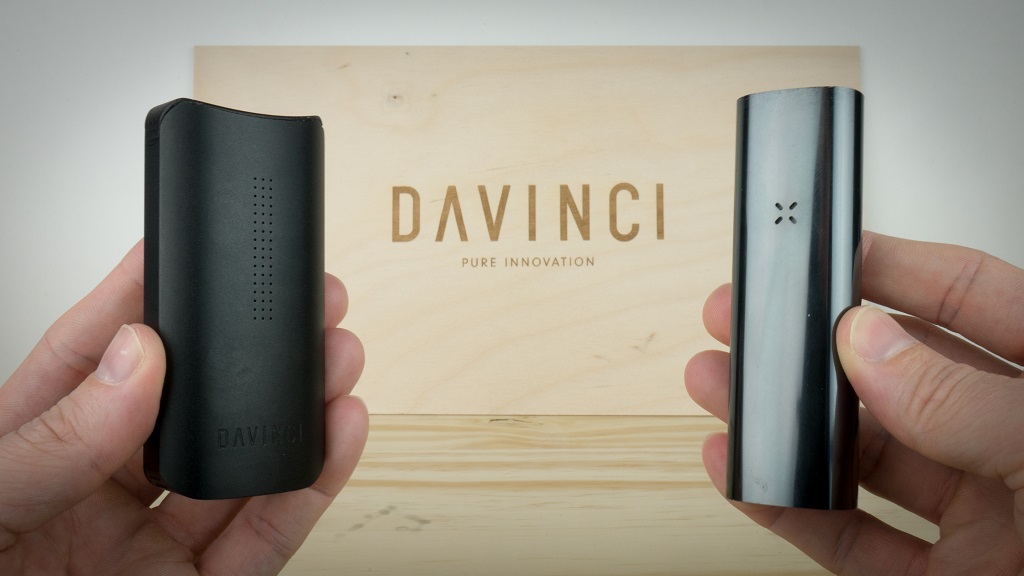
Personally, I like the vapor quality on the IQ a bit more than the Pax 3, especially regarding vapor density. I also like the removable battery option on the IQ and I’m very excited to test it out this winter ski season but the smaller/lighter design of the Pax 3 is tough to beat if you need absolute portability.
I’ve found the Pax 3 gets about 100 minutes of use per charge and takes about 100 minutes to fully charge from dead. Whereas the Davinci IQ gets about 50-80 minutes of average use and takes about 240 minutes to fully charge from dead. (or 120 minutes with the external charger)
If you are really not sure you are ready to pony up $249, the Pax 3 is also offered in a “Device Only” kit which runs $199 and then the Pax 2 which retails for $149 is another option. It doesn’t come with the smartphone app, offers a little smaller battery capacity and takes about 45 seconds to heat up instead of about 15 seconds on the new Pax 3, but it’s still simple, rugged, reliable, and comes with the 10-year warranty.
Crafty Plus ($279) – None of the vaporizers mentioned above can keep up with the smooth, tasty vapor quality offered by the Crafty. The Crafty is also one of the easiest and most consistent vaporizers that I’ve tested. If you are on the fence about the Davinci IQ, I would highly recommend checking out my review of the Crafty Plus first.
Glass Options
I have been using the IQ through glass quite a bit at home lately and it works very well. The IQ has no problem milking any of my bubblers or hydratubes. It is basically a smaller and hugely improved version of the hydratube.
It does a great job of not spilling even at odd angles, and it stays in place so you can easily pass the vape around 1 handed with bubbler attached, something that never worked well with hydratubes.
Davinci IQ Review Summary
Overall, I’m very happy with the Davinci IQ. I was getting really antsy for Davinci to put out a new portable, but now I am glad they took a while and did it right. I feel like the quality, features, size, and design are all on point. Plus it comes with a 10-year warranty from a solid company with a long track record.
The biggest downside for me is the charge time which can be drastically improved with an external charger. I can also see some people wishing the IQ had an option for concentrates but I’m mostly a dry herb only kind of dude so that’s not a big deal for me. Plus you can always sandwich them in the middle of a bowl if you really want.
Thanks for reading my Davinci IQ vaporizer review and let me know if you have any questions about the IQ or any other vaporizer by leaving a comment below, or hitting me up on my contact page.
Davinci IQ Vaporizer

The IQ offers great taste, performance, and versatility but how is the reliability and durability? Check out my davinci iq review + video for more info.
8.9
Davinci IQ Vaporizer Review Video
Davinci IQ Vaporizer Review Video Transcript
Intro
Hey guys Buzz here with vaporizerwizard.com and today I’ll be reviewing the Davinci IQ portable vaporizer. The IQ is a dry herb conduction vaporizer made by the company Davinci. It uses a ceramic zirconia vapor path, features a full temp spectrum, offers a replaceable battery system and comes with a 10-year warranty.
The IQ’s compact size, recessed mouthpiece and haptic feedback make it very easy to use while on the go and the pure taste from the ceramic vapor path make it very enjoyable to use at home as well. The IQ is also currently my highest rated conduction vaporizer for overall enjoyment of use, and vapor quality.
I use the IQ most for outdoor activities because it fits anywhere with its compact size, it’s easy to use in group situations, and it works for short or long trips with replaceable batteries. The Davinci IQ ranks highest in categories like overall portability, vapor quality, and overall control over sessions. At the time of this video the Davinci IQ retails for $275.
You can click the links below in the about section or in the top right corner to get the current price directly from Davinci and a full review on my website.
In this Davinci IQ review, I’ll go over the features and how to use the IQ with and without the APP.
I’ll go over the battery info, charging options, mouthpieces; Jump into a quick vape demo and finish up with my pros/cons. So let’s jump into my full Davinci IQ review. Ok guys so here is the Davinci IQ vaporizer.
Overview
It’s very small and compact with a good weight to it. It’s easy to pocket, easy to conceal and I can pretty much completely palm it for discretion. The buttons feel nice. They are easy to push and very responsive. The LEDS are precise and very bright with an option to dim them if needed.
The outer shell is a smooth brushed aluminum finish and it’s available in Stealth, which is the color I’m using in this video, Copper, Gunmetal and Blue.
The main components of the IQ are the top lid with mouthpiece. Below that is the flavor chamber and battery. The buttons are located along the side, followed by the lower lid, the pearl, and the chamber.
With the IQ you get two mouthpieces, one recessed and one raised that doubles as a 10mm water pipe adapter. You get one 18650 3500mAh battery and a micro USB charging cable.
You get one carry can, a keychain tool, some cleaning items and lastly, the Davinci smartphone app available for both iOS and Android. Davinci sells quite a few accessories for the IQ and here are the ones that are worth considering.
Accessories
First would be an extra battery. Davinci is currently selling them for $10.95. Next item is the 10-14mm water pipe adapter. This is definitely not needed but works perfect if you already have glass at home or planning on picking some up. The glass option I have been using most is the Nectar Collector HoneyBird Combo. Once again this item is not needed but I’m very impressed with the results. This will fit directly over the included 10mm mouthpiece and I’ll use both of them in the vape demo towards the end of this video. The last item that comes in handy is the soft padded Carrying Case. This case easily fits the IQ with some extra batteries or the Honeybird Combo.
Size Weight
The Davinci IQ is 3.54 inches tall, 1.65 inches wide and .94 inches deep. It weighs roughly 145 grams which is a little heavy for its size but overall it feels good in the hands.
By comparison the Pax 3 is 90 grams and the Crafty is 135 Grams. Both the Pax 3 and IQ can easily be pocketed for use on the go but the IQ is one of the only vaporizers that I can completely palm for discretion.
The Pax 2 and 3 come close but the height causes it to stick out. The Davinci IQ comes with two ceramic zirconia mouthpieces.
Mouthpiece
One is a recessed flat mouthpiece that makes the unit easy to palm and conceal. The next is a raised mouthpiece that doubles as 10mm water pipe adapter. I personally feel like I get better air flow and slightly less draw resistance with the 10mm raised mouthpiece. But you also lose out on the concealment factor.
So I tend to use the raised mouthpiece at home and swap to the flat mouthpiece when I head out. The mouthpieces are easy to swap in and out. First, flip up the top lid and pull out the silicone gasket. Remove the mouthpiece from the mold and swap in the one that you want. The end of each mouthpiece will have grooves that slide into the silicone gasket. After you lined up the groves, make sure the vapor path is lined up and place the mouthpiece into the top lid. The vapor path will line up right over the flavor chamber and we’re ready to close the lid.
Flavor Chamber
I’ll go ahead and swap back to recessed mouthpiece so you can see how to replace it. The IQ comes with a ceramic zirconia chamber insert called the Flavor Chamber.
The flavor chamber increases the vapor path surface area helping to cool and smooth the Vapor. You can also place dry herbs into the chamber and the vapor will condense on the herbs potentially increasing potency for a later session.
I have tried throwing some small nugs in the flavor chamber and running a few sessions but I didn’t really notice much of an increase in potency. It decreased the overall enjoyment of the session because the herbs didn’t taste as good and it added additional draw resistance.
You could try something like Mint for some added flavor but overall I prefer to just leave the flavor chamber empty. Now it does stop a lot of the materials that would normally build up in the mouthpiece which cuts down on overall cleaning time.
Cleaning
To get to the Flavor Chamber just lift up on the top lid and if it’s a new unit it should just pop right out. It almost comes out too easy when it’s clean and I’ve launched it out on accident so be careful of that.
If you’ve been using the unit and it’s a little dirty like mine, grab the included tool that comes in the top, place it inside the center hole of the flavor chamber cap and lift up with the lip. It should come right out.
Now you can also use the same tool to remove the cap. Keep it placed inside the hole, rotate and pull up. Rotating it helps it come out easier if it wants to stick. When you’re done you can just push the lid back into place and drop the flavor chamber back into the vapor path.
You can also use the unit without the flavor chamber but I’ve found that it increases the vapor temperature and harshness while making cleaning more difficult. So I just prefer to keep it in place. Don’t forget to slide the cleaning tool back into place!
Chamber
The Davinci IQ uses a ceramic zirconia chamber which is the same material as the outhpieces, flavor chamber and the pearl. The Pearl works by slightly decreasing chamber space and reflecting heat. This will increase vapor production and helps with the overall consistency of the chamber. Technically the pearl is able to twist up and down but I strongly recommend just leaving it fully screwed in because it’s very easy to lose and you can possibly break the silicone post with over adjusting.
Grinding
I’ve been getting about .3 grams with an average grind and a medium tight pack from my Santa Cruz Shredder and as much as .5 grams with a very fine grind from the MFLB finishing grinder.
My personal preference is to use the Santa Cruz Shredder and grind upside down to get a finer consistency. A medium tight pack will give you the best results and a quick stir with the included tool does help, but is not needed. A finer grind and tight pack will increase draw resistance and overall cleaning but produce bigger clouds.
Battery
The Davinci IQ uses a replaceable/rechargeable 3500mAh 18650 sized battery and the IQ charges via a micro USB charging cable. The battery is charged within the device and it does NOT come with an external charging Dock. At the time of this video, you can pick up extra batteries for $10.95/piece.
The average battery life is pretty decent at about 50-80 minutes per full charge but the IQ battery takes roughly 240 minutes to fully charge a dead battery within the unit.
You can mitigate this by picking up an external charging dock which will charge two batteries at the same time in about 150 to 180 minutes instead of the 240 minutes that it takes to charge within the unit. I recommend either the EFEST SODA which will run about $10, or the Nitecore I2 which is about $16. I’ll have links to both down below in the about section.
Battery Life
The battery is located under the mouthpiece and you can get to it by opening the top lid, pulling back on this latch, and it should pop right out. To get it back in, open up the door, the slightly raised end goes in first, push down the lid and over to secure the latch. The IQ offers better battery life than the Crafty but not quite as good as the Pax 3.
Both the Pax 3 and Crafty will charge faster than the IQ. But only the IQ offers a replaceable battery system. The Pax 3 averages 100 minutes of use on a full charge and 100 minutes to charge from Dead. The Crafty averages 30-45 minutes of use and takes roughly 120 minutes to fully charge a dead battery.
Heating Options
To turn on the IQ, press the control button 5 times. The control button is the single circular button at the top. The device will show your current battery life and begin heating to your last set precise temp or smart path. From here you can choose between three different heating options…
Smart Paths, Precision Mode, and Boost Mode.
With Smart Paths, you get four fully customizable session options. Each path can be set with an exact session duration, starting temp, middle temp and ending Temp. Now you can only customize these smart paths with the Davinci APP so I’ll get more into the app functionality in a minute. The default Smart Paths run from 350 to 430 degrees Fahrenheit with the first path starting at 350.
From there, the temp will gradually increase to 370 at the 5 minute mark and maintain 370 degrees for the remainder of the session. Smart Path 2 runs from 370-390, smart path 3 is 390-410 and the fourth default smart path runs from 410-430 degrees Fahrenheit.
The next heating option is Precision Mode. Precision Mode allows you to select any temp between 250 and 430 degrees Fahrenheit. In order to get to Precision Mode from Smart Path Mode, push the control button one time and quickly select a temp to stay in this mode. After selecting a precise temp, the display will show the current temp as the device heats up. Press the up or down arrow to change temps and press the control button one time to get back to the Smart Path Mode.
The Last option is Boost Mode. Boost Mode is activated by pressing and holding down the control button. Activating boost mode will rapidly increase oven temperature all the way up to 430 degrees Fahrenheit and maintain that temp until you let off. Letting off the button puts the device into a rapid cool down mode and places it in standby. Press the control button or the up down arrows to return to your previous setting.
You can also activate stealth mode which dims the LEDS by pressing the Control button and the down button at the same time. The control button and up arrow will bring it back to full brightness. It’s definitely nice to be able to dim the LEDS without needing the app. Click all three buttons at once to switch between Fahrenheit and Celcius and the Up/Down buttons together will check current battery life.
Smart Paths
The first thing I’ll go over is how to use the device with the app and walk you through how to set up a custom smart path. When you first open the app, it will show you the current status of the device in the top right corner with the current temp and the target temp towards the bottom.
If you just wanted to select a default smart path and be done, click the “select smart paths” option at the very bottom. From here, you can select any default smart path, the device will turn on and automatically begin heating. It will also display the path you selected in the top right corner and how many times you’ve used this specific smart path. Lastly, the unit will vibrate once the device reaches temp. If you just wanted one precise temp, you can press the plus or minus button and the heater will automatically begin heating to that temp. You can turn the device off by pressing the standby button below the target temp.
Now to edit a Smart Path we’re going to click on the menu option in the top left, select smart paths and then select which path we want to edit. I’m going to pick smart path 4. From here you can pick a name if you want…and then select “edit path”. I’m going to edit this path for the vape session coming up shortly so I’ll be starting higher than I’d normally prefer. I’ll demo the mouthpieces first, then the nectar collector combo followed by the WPA and Bubbler combo. My first starting point I’ll set to 380 degrees Fahrenheit at one minute for the dry mouthpiece hits. I’ll then quickly climb to 420 degrees over the next minute while I begin to the use water Pieces. I’ll set the last point to 430 degrees which will have it gradually climb 10 degrees over the next 8 minutes. You could also set the last point to something below 10 minutes if you wanted a quicker session.
Once you are satisfied with your selections, press the save button and from here you can either click done to go back to the smart paths dashboard or click start and your session will automatically begin.
You can do this for all 4 smart paths and once they are set you can change between them with the up/down buttons. You’ll just have to remember what number corresponds to what path.
Some of the other settings within the app include turning off and on vibration alerts which is something you can’t do without the app. You also have access to device information like total usage time, average session length, average temp and favorite path. You also have access to a complete plant guide, tons of walkthroughs, the full user manual in pdf form, a few troubleshooting tips and frequently asked questions.
Maintenance
The cleaning and maintenance is pretty easy with the Davinci IQ. All of the components can be easily removed and for the most part you just drop them into some ISO. Routine maintenance for me consists of emptying the chamber and brushing out the bowl when I’m finished with a session.
The biggest indicator that the IQ is getting dirty and needs to be fully cleaned will be the draw resistance. You can also clearly see buildup forming around the holes of the mouthpiece and the flavor Chamber. The top mouthpiece will get the dirtiest the fastest but it’s also the easiest to remove and clean.
So for a full cleaning you’ll remove the mouthpiece from the silicone housing. Drop the mouthpiece in some ISO, and you can clean the silicone gasket with warm soapy water.
Next we’ll remove the flavor chamber from the IQ and remove the gasket from the lid. Drop both glass pieces into some ISO and clean the gasket with some warm soapy water. Next, grab a q-tip and throw a small amount of ISO on the end of it. Flip the IQ upside down to make sure that we don’t get any liquids in it and swab out the oven.
Like I mentioned above, I don’t remove the pearl from the chamber so I just wipe it down with an ISO soaked paper towel or q-tip. The easiest spot to overlook is the space underneath the flavor chamber and between the bowl. For this, I’ll use the brush that came with the IQ, flip the IQ upside down and run the brush through the chamber. You’ll want to push it up against the silicone stopper at the bottom.
This way the brush can get to the materials underneath. Rotate the brush a few times and you’re good to go. Overall the Davinci IQ isn’t too hard to clean, but lack of cleaning will cause increased draw resistance. So now that we’ve covered pretty much all the basics of the Davinci IQ, let’s go ahead and jump into the vape session.
Vape Session
So for this vape session I will be loading about .3 grams using my santa cruz shredder but grinding upside down so I can get a little finer consistency. Finer grinds will increase draw resistance but produce bigger clouds, whereas an average grind will produce better air flow but the vapor will not be as dense. Be sure to load the entire chamber for best results.
I’ll select the custom smart path 4 that I created earlier. Now I usually start out a typical session on smart path 1 or 2 and end my session on smart path 3 which is a longer more casual session. So this demo will be a more sped up session to show you what kind of vapor density the IQ can produce. I’ll use the recessed mouthpiece first, swapping out for the raised mouthpiece, followed by the Honeybird Nectar Collector Combo and finishing up with the 10-14mm Water Pipe adapter and d020-d bubbler.
I would say that I average between 10 to 30 draws in a session and sessions will typically last anywhere from 5-15 minutes depending on your herbs, starting temps, lung capacity, and if you will be using any glass attachments. It’s also important to note that the IQ chamber is pretty large. At the time I made this video, the word from Davinci is that they are working on a ceramic chamber spacer. But in the mean time I have a quick modification for shrinking the chamber size which you can check out in my full review at vaporizerwizard.com . I will also update my article and this video when the spacer is released.
The IQ has about average draw resistance for a conduction vaporizer and I find that I get slightly more air flow with the raised 10mm mouthpiece. The IQ also has some good weight to it which makes it easy to grip and pass around. It works great for long slow draws or short sips, so I find that the Davinci IQ works very well in group settings. One last thing you can do with water pieces is activate the boost mode after you start your draw.
Pros
So the first pro would have to be the extremely compact size of the IQ. It’s easy to grip, pass around and I can pocket it easily on the go.
The IQ is also the best tasting conduction vaporizer that I have tested at this point. I found that the Davinci APP is the most enjoyable to use and quite possibly the best app for a portable vaporizer.
I also really like the replaceable battery system. It’s definitely not the fastest at charging batteries but you can pick up some great external charging options for cheap and extra batteries currently run $10.95 from Davinci. You also get multiple mouthpieces, one of which doubles as a WPA. The custom smart paths provide all the customization that you could want. You get a full temp spectrum via the precision mode. Lastly, the Davinci IQ comes with a 10 year warranty.
CONS
The first con would have to be fact that it takes 240 minutes to fully charge a dead battery within the unit. It’s easy to pick up an external charger but now you’re spending more money to get the most out of your vaporizer. Next would be the draw resistance and it’s not bad. It’s just not as free flowing as models like the Crafty or Mighty. I also wish that the pre-heat time was in the 20-30 second range instead 40-60. I wish the Davinci spacer was out now I wish the vibrate had a low setting (keep either one or both)
Overall the Davinci IQ will work perfect if you’re looking for a very pocketable unit, a replaceable battery system, and the purest tasting conduction vaporizer that I have tested to date. You also get full control of your sessions without the need for the Davinci IQ smartphone App.
Final Thoughts
I can safely say that the Davinci IQ is one of the most enjoyable session vaporizers that I have used. The replaceable battery system is perfect for both long and short trips, plus it works great at home especially with the Nector Collector Combo or the WPA option. You can buy the Davinci IQ or check out my full article with more pictures by following the links down below in the about section.
If you have any questions about the Davinci IQ or any other vaporizer, feel free to leave a comment below or contact me on my site vaporizerwizard.com. Don’t forget to like and subscribe if you enjoyed this video. I’ll be working on The Best Portable Vaporizers for 2017 video next. So stay tuned, thanks for watching and take it easy.