The Solo is a portable vaporizer made by the Canadian company Arizer. The Solo’s all-glass vapor path creates excellent vapor quality, and it’s one of the easiest portable vaporizers to use.
Arizer has been busy! Since the release of the OG Solo, Arizer has release four new vaporizers. That’s right, four. The OG Solo got an upgrade and is now the Solo 2 vaporizer. They also introduced the Air vaporizer, followed by the Arizer Air 2, and last but definitely not least, they came out with the Arizer ArGo.

As you can imagine, the Solo 2 is everything great about the OG Solo but with a full temp spectrum, better battery life, and quicker heat times. The Air 1 and 2 vaporizers are the slimmer, more portable version of the Solo 2, and the ArGo Vaporizer is the smallest, lightest, most pocket-friendly vaporizer Arizer has ever made. I think you will really like it if you are looking for a vape with absolute portability and great taste.
I also wrote up a full “Arizer Vaporizer Buying Guide” with information about all of the Arizer vaporizers, both portable and desktop. Check it out and let me know if you have any questions. If you aren’t quite sold on Arizer products, you can always check out my up to date and current list of the best portable vaporizers.
I like my Solo because I feel like it has some of the best vapor quality of any portable vaporizer under $100. It uses a ceramic heating element and an all-glass mouthpiece to deliver excellent taste and vapor density. The stems really smooth and cool the vapor nicely, although they do lower portability.
You can pick it up here for $81 with coupon code “25OFF”. All of the Arizer vaporizers are still for sale, and I would recommend any one of them. It just depends on your situation and how you’ll be using it. Read on below to get the full OG Solo vaporizer review.
Size, Portability, Durability

One of the main features I like about my Solo is the unit’s durability as a whole. I say “as a whole” because the glass stem can fall out and break if you aren’t careful, but the unit’s main part is virtually unbreakable. I’ve seen it get run over by a car and still work.
On top of the unit being very tough to break, the battery is high quality and lasts longer than most other vapes.
I do have a few problems with the glass mouthpiece, though. It doesn’t secure anything other than sliding into the ceramic heating chamber. If the unit were to fall over or get knocked off a desk, the glass mouthpiece is the first thing to break.
The mouthpiece is pretty cheap to replace, but it’s more of a hassle replacing it, not the glass tube’s actual cost. I try to be pretty careful with the glass stems, but I have broken two over the three or so years of use.
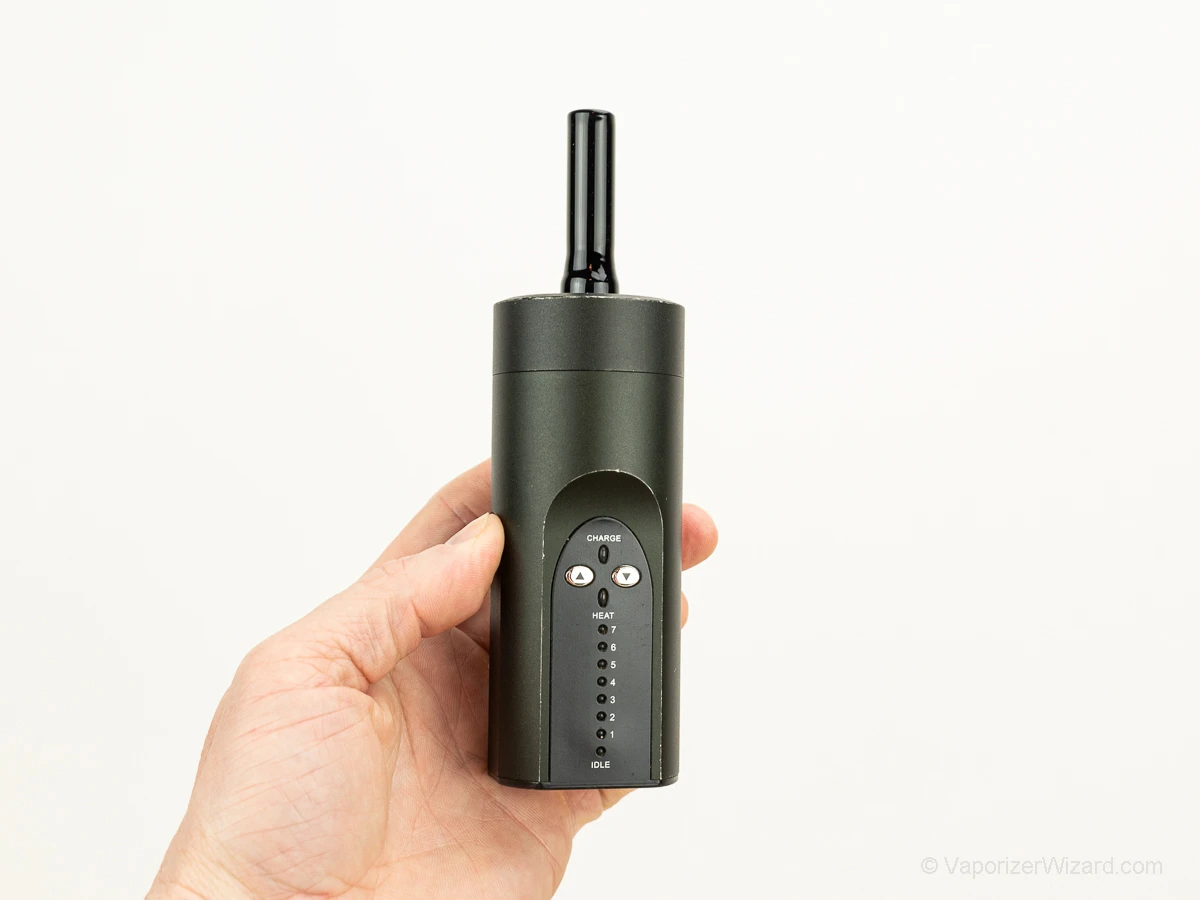
Arizer Solo Charging and Heating
Up until recently, the Solo was only able to be used if the unit was charged. However, the newer units can be charged while simultaneously using it, which sets this portable vaporizer apart from the rest of the market for home use.
Another great feature of the Solo is the seven different heat levels. It allows you to vape at any temperature setting. I prefer to start a freshly packed stem at levels 3-5, depending on my mood, and then climb to 6 towards the end of my session.
The solo comes with an automatic shut off timer. After 12 minutes of use, the Solo will shut off to help with battery life. I personally like the 12-minute timer since that is about the length of a session. I don’t have a problem with turning on my vapes and forgetting about them, so I generally am more annoyed when a vape shuts off every minute or two. Then I have to turn it back on a half dozen times during a session.
The only real downside is the actual size/weight of the unit. This is the main reason the Solo takes a hit on its score. The Solo is not as portable and discrete as I would like. If I had to take a vaporizer with me on a trip or out hiking/biking, I would much rather take one of the smaller units without glass.
The Solo’s glass mouthpiece isn’t secured to anything and can easily fall out if you’re not cautious. I’m sure I’ll have a few people disagree with me, but that’s just my personal opinion. With all of that said, the Solo is a great vape to use around the house, take out on the deck, bring over to a buddy’s house. Just don’t expect to throw it in your pocket and go for a hike.
Solo Screen Modification

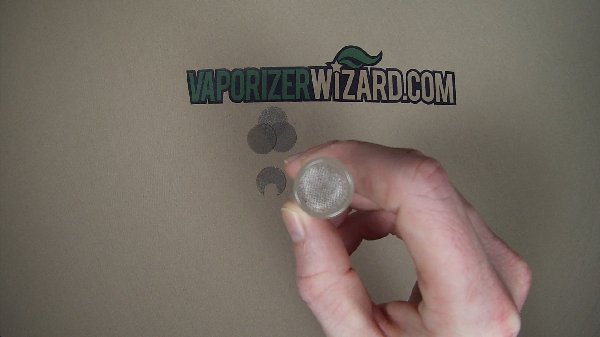
One minor downside to this unit is the holes in the bottom of the glass stem are too big for a fine grind and will leave you with some snacks in your mouth. This would be a major downside for me personally if it weren’t so easily fixed. All you have to do is cut a screen to the right size and place it at the stem’s bottom.
This modification, which can be viewed at 2:30 in the video above, will eliminate herbs passing through the holes and into your mouth. If you do not want to add a screen to the vapor path, you can grind your herb more coarse and chunky, and you won’t have near as many problems. You will also notice that a freshly cleaned stem will cause more problems than a slightly dirty one.
Solo Vaporizer Review Summary
Overall, even today, the Arizer Solo is still one of the best portable vaporizers to use at home with the “option” to take it on the go. If you are interested in buying the Solo, click here for the authorized dealer I buy my vapes from.
I recommend checking out my favorite portable vaporizers if you don’t think the Solo will fit your needs. Thanks for checking out my review, and if you have any questions about the Solo or any other portable, feel free to leave a comment below.
Arizer Solo Vaporizer Review & Demo
Video Transcript:
Introduction
Hey, guys, buzz here with vaporizerwizard.com. Today I will be going over the solo portable vaporizer by Arizer. The price for this vape at the time of this video is $224. You can click the link below to get the current price on this unit.
The Solo is a convection/conduction vaporizer with 7 different heat levels, and it uses an internal rechargeable battery. One of the first things I noticed about the solo is it’s built very strong and has a bit of weight, which isn’t necessarily bad in a portable vaporizer. It has great taste and vaporizes your herbs evenly without having to stir or mix. I feel like it’s perfect for moving from room to room at home, playing video games, or watching a movie. However, you will have to take extra precautions when traveling due to the glass mouthpiece, and I’ll get more into that later.
So first, I’ll go over the features and how to use the solo. Do a quick vape session, tell you what I like and don’t like about the solo, and then suggest the best place to pick one up.
Ok, so this is the Solo portable vaporizer by arizer. This unit has great vapor quality and medium vapor density while being easy to use and simple to maintain.
Immediately you’ll notice this unit is built to last. It has 7 different heat levels ranging from level 1, 122 degrees Fahrenheit, to level 7, which is 410 degrees Fahrenheit. It has an internal rechargeable lithium-ion battery that recharges in about an hour and can hold a charge for up to two hours of use. It also has a slightly above the average-sized all-glass filling chamber.
To turn the Solo on, you’re going to press down on both the up arrow and the down arrow simultaneously. It will power on and show you the battery life remaining on the unit. Here it shows that the battery life is at a level 5, which means it’s pretty much fully charged. Once the unit is powered on, you can click on the up arrow to pick the temperature setting you wish to vape at. I prefer to start my session at level 4 or 5 and then bump it up to 6 towards the end. I’ll set it at level 4 here and show you how long it takes to heat up. It usually takes about 1:20 to 1:30 to get to level 4, 5, or 6. Once it gets going, it will heat up pretty fast. Another cool feature is the auto-shutoff timer. After 12 minutes of continuous use, it will automatically turn off, which will help you conserve your battery life.
You will know the unit is ready to vape once the LED is lit up on your selected temp level. The next step is to load the glass stem and place the end with the bottom’s holes. Here is a view from the front and a view from the top to see what it looks like. Another nice feature about the solo is that the glass stem will fit perfectly in the normal 14mm or 14.5mm slides. This allows you to use it with your water pieces. Sometimes filtering the vapor through water can make your sessions more smooth and enjoyable.
Now one of the few complaints I have about the solo is the glass stem itself. The holes in the bottom of the stem are a bit too big and will allow your dried herbs to travel up the stem and into your mouth. This was pretty annoying at first, but I could do a quick, cheap modification that put a stop to this. All you have to do is pick up a few screens from your local head shop, cut out the size needed to fill the glass stem, and place it in the bottom over the holes. This will stop the herbs from getting in your mouth and make your vape sessions a lot more enjoyable. As you can see here, it doesn’t really take away from the number of herbs you can place in the stem. I also noticed it didn’t change the vapor quality or limit the amount of vapor density I could get from my sessions.
Like I mentioned earlier, the Solo has an internal rechargeable battery that will last up to 2 hours of continuous use. Now because my solo is the older model, I’m not able to charge and use the unit simultaneously. Lucky for you, the new models have fixed this issue, and you can now charge the unit while vaping, just like the Vapir NO2. When charging the unit, you plug in the included wall charger and then insert the other end into the unit’s bottom. While the unit is plugged in, you will see your current charge level, which helps when you may only be charging it to get in a quick session or knowing that you want it fully charged before you head out for the day. While it is charging, it will also show a green blinking LED on the top. A full charge from a dead battery will take about an hour.
Ok, so here’s a quick vape session with the Solo. To turn the unit on, press down on both the up arrow and the down arrow simultaneously. Once the unit is on, go ahead a select the temp level you want. I’m starting at 5 to get a bit more of a dense vapor cloud with a fresh bowl. The temperature for level 5 is approximately 393 degrees Fahrenheit. The unit can reach any of the desired temperature levels in 2 minutes or less. As you can see, this unit is straightforward to use and also simple to maintain because it only has two pieces: the base and the glass stem. As you can see here, to get to level 5, it took about 1:26 seconds.
One of the other things you will notice with the solo is a bit of resistance to the draws. It does take a session or two to get used to. The main tip that I can recommend is to slow down your draws and reach about 15 seconds per drawing. This will ensure you get dense vapor and the best vapor quality. The other tip that I recommend is to pack the stem fairly tight but not overly tight. After a couple of trial and error sessions, you will be able to figure out the best method. If you pack the stem too tight, the unit won’t vaporize the herbs as evenly, and it will add extra draw resistance. I’ve been able to get about 9 full 12-minute sessions before the battery dies, and then I have to plug the unit back in. Now sometimes, if you’re running a longer session, the unit will turn off on you to help conserve battery life. Don’t panic. You can turn the unit back on and reselect your desired temp level and resume your vape session. And then to turn the unit off, it’s the same routine as powering on. You press down on both the up arrow and the down arrow.
OK, so now I’ll go ahead and get into the pros and cons. I feel like the Solo has the best vapor quality of any portable unit I’ve tried. It’s also built to last, I’ve dropped mine plenty of times, and the only thing that ever happens is the glass mouthpiece will break, and that’s only about ten dollars to replace. It’s also straightforward to use. It’s low maintenance and cleaning compared to other portable vaporizers. All you have to do is just run a little bit of alcohol through the glass mouthpiece, and that’s it. Now some of the con’s, if you don’t modify the glass stem-like I was talking about earlier in the video, you’ll have to deal with some of the dried herbs coming up into your mouth. However, this is an easy mod and very cheap. There is some draw resistance, but overall it’s less than the Pax. Also, the Solo is only partially portable. It won’t fit in your jean pockets, but it will fit in a backpack, large jacket, or a hoodie. The glass mouthpiece isn’t fully secured, so it might fall out if it were to tip over. Just a quick tip, when traveling, I recommend using a rubber band or a couple of twist ties to secure the glass mouthpiece to the unit.
So I wanted to thank you for taking the time to watch my arizer solo vaporizer review. If you’re interested in buying the solo, you can click the link below for the current price through an authorized dealer. You can also click the link to my website to get the full review. If you found this video helpful, please like and subscribe. I’ll be making a lot more vape videos, including tips & tricks, cleaning tutorials, and new vaporizer reviews. If you have any questions, comments, or suggestions, go ahead and leave them below, and I’ll get back to you as quickly as possible. Thanks again, and have a great day.